Configure Tab
The Configure tab provides advanced settings to manage how your form behaves, appears, and interacts with users after design.
It includes four main sections — Status, PDF Settings, Device View, and Shared Submission — each serving a unique purpose.
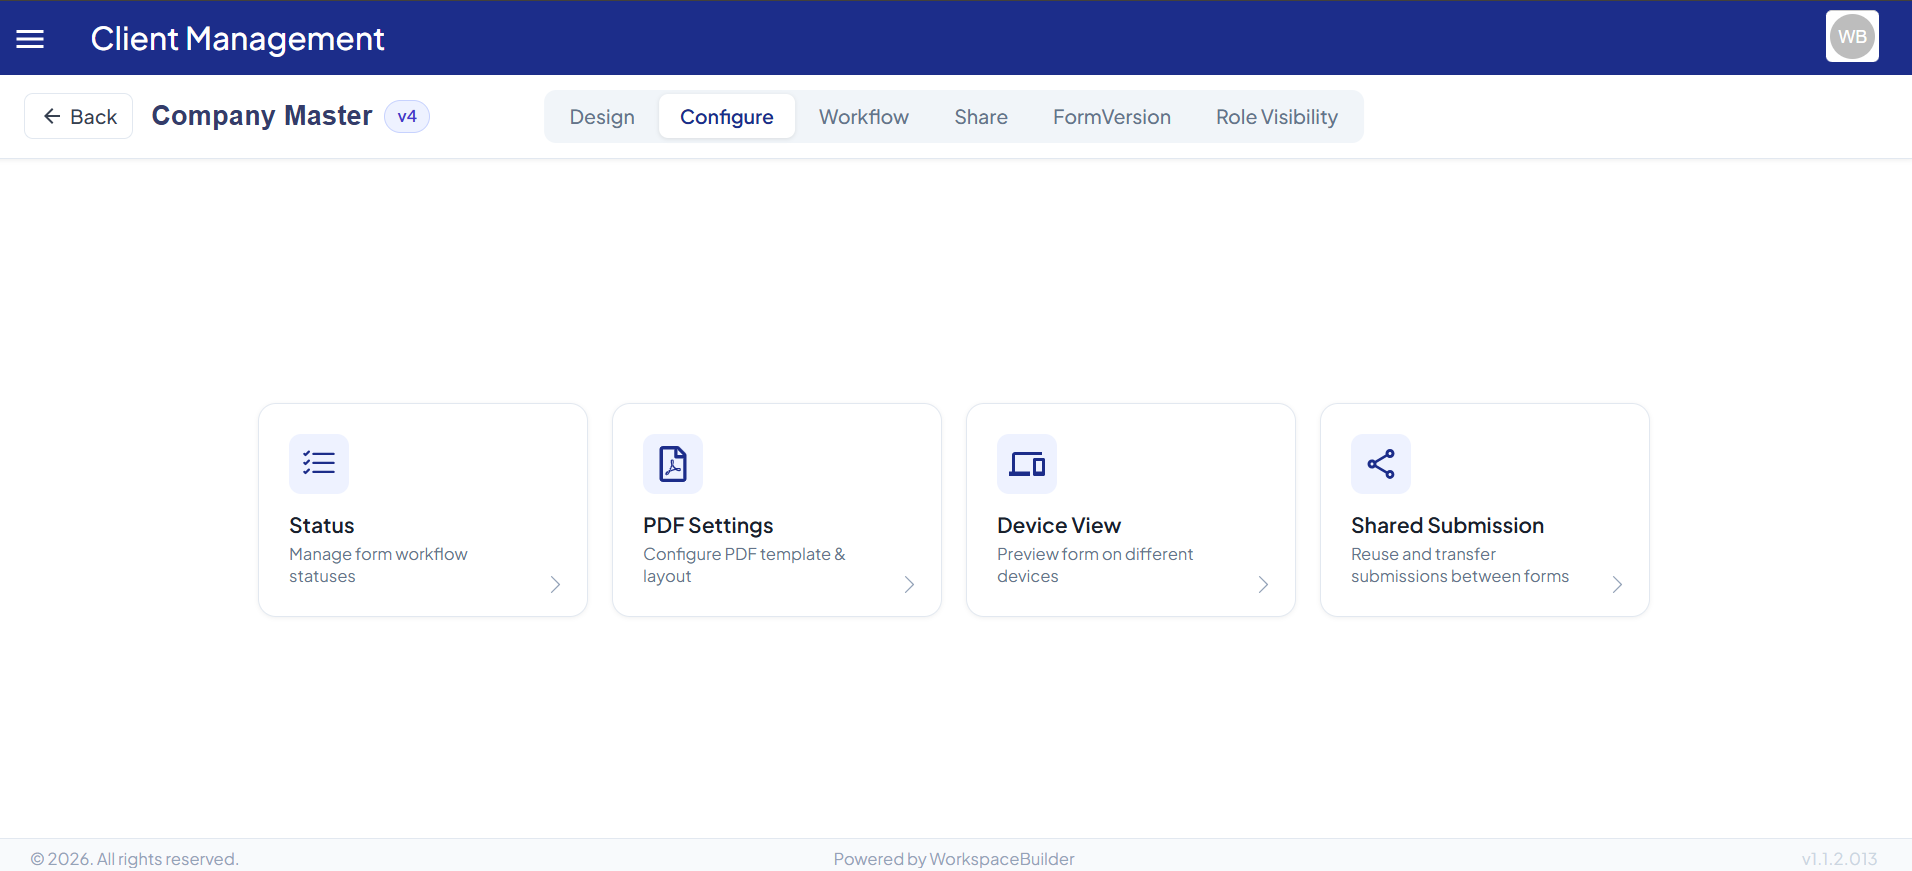
Through this tab, you can track form submissions using statuses, customize PDF outputs, control which devices your form supports, and link submissions to other forms — all from one place.
Configure - Status
Statuses help define the current state of a submission — such as Pending, Approved, or Rejected.
They act as tracking indicators that allow admins and users to monitor progress throughout the form's lifecycle.
In the Submission View, these statuses are visible to end users, giving them clear updates about their form's progress.
Opening the Status Panel
- Navigate to your form and click on the Configure tab at the top.
- You will see the four configuration cards — Status, PDF Settings, Device View, and Shared Submission.
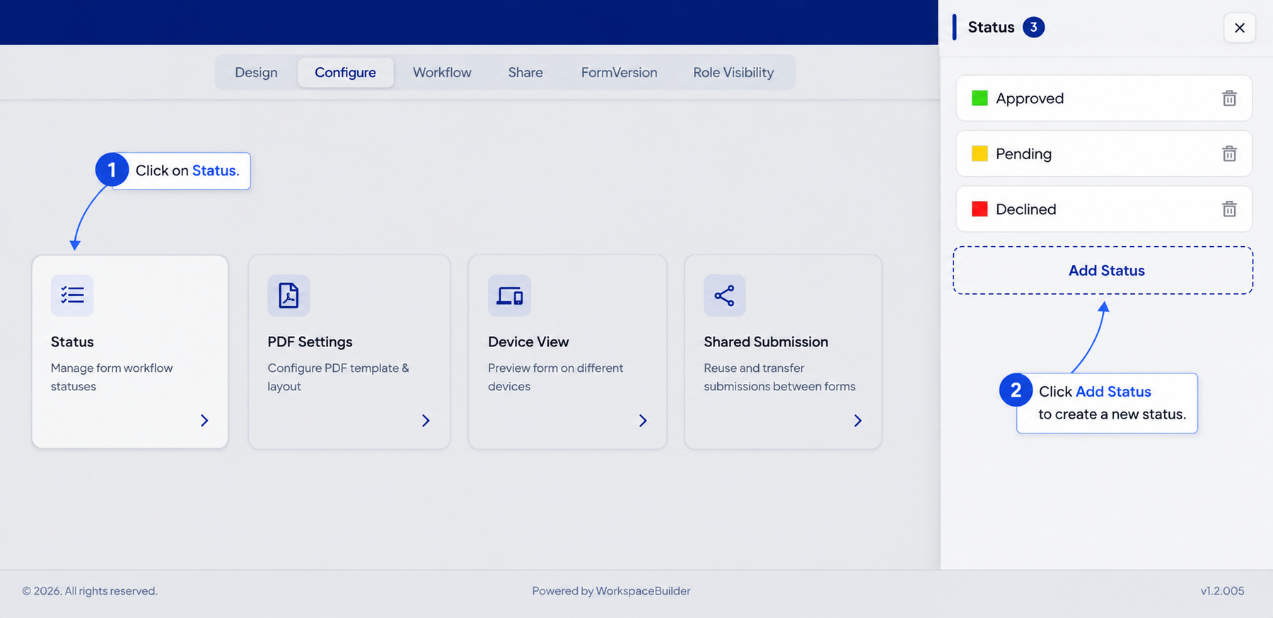
- Click the Status card to open the Status configuration sidebar.
- The sidebar appears from the right side of the screen.
Adding and Managing Statuses
Inside the Status Sidebar, you can create and customize multiple statuses.
Add New Status
- Click on the Add Status button.
- A new status entry will appear in the list.
- You can rename the status to something meaningful such as:
- Pending Review
- Approved
- Rejected
- In Progress
Each status entry has:
- A color indicator for quick identification.
- A delete icon to remove unwanted statuses.
Editing a Status
Click on the text field beside the color block to rename the status instantly.
Usage in Submission Workflow
Once statuses are defined:
- They become available in the form's workflow or submission tracking system.
- When a user submits a form, an admin can change the status to indicate its progress (e.g., from "Pending" to "Approved").
- On the user side, the updated status will appear alongside their submission record — providing a clear, visual indicator of progress.
Example Use Case
| Scenario | Status Flow Example |
|---|---|
| Loan Application | Draft → Under Review → Approved / Rejected |
| Support Ticket | Open → Assigned → Resolved → Closed |
| Registration Form | Submitted → Verified → Approved |
Configure - PDF Settings
The PDF Settings section allows you to manage how your form data is exported, downloaded, or attached as a PDF.
It ensures that submissions can be easily shared, stored, or printed with a consistent document layout.
You can configure:
- Custom PDF templates
- Page layout and margins
- Field visibility (decide what appears in the exported file)
- Auto-generate PDFs after form submission
This feature helps in creating official reports, invoices, or certificates automatically from form data.
Note: PDF Settings are disabled for forms that are already configured as a PDF form type. A toast notification will inform you if this section is unavailable.
For a detailed guide on creating and customizing PDF templates, click here.
Configure - Device View
The Device View panel allows you to control which devices your form can be accessed or displayed on.
This ensures that your form behaves consistently across different screen sizes and device types.
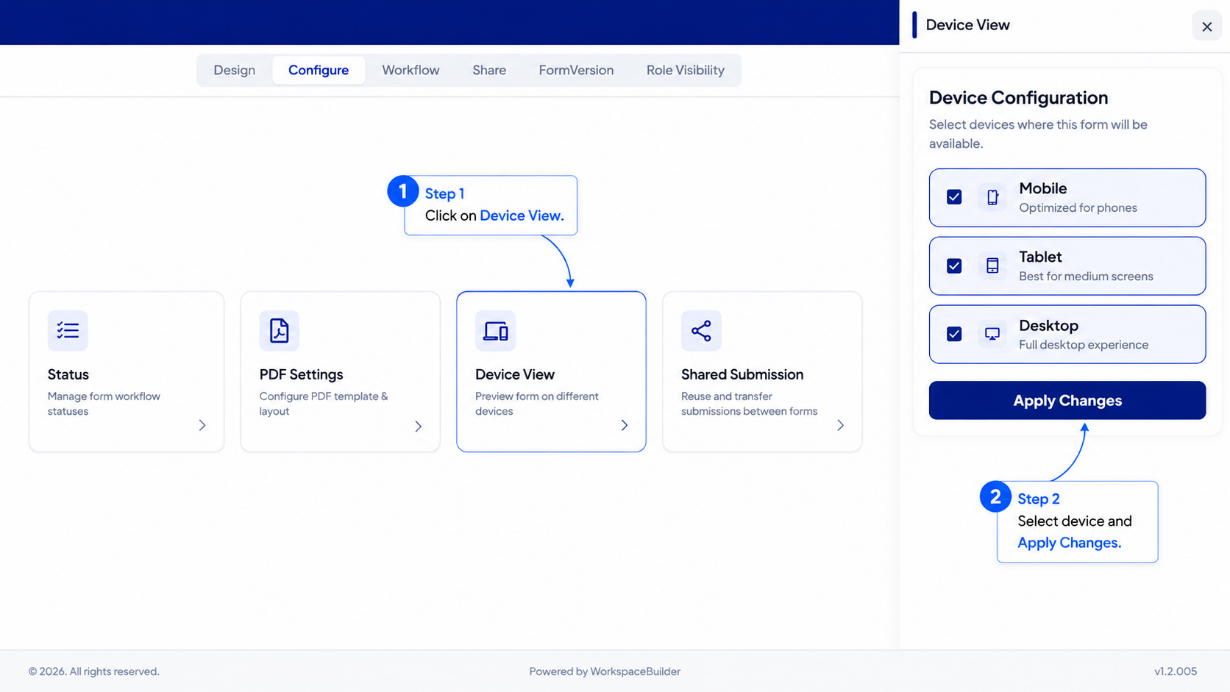
By configuring device access, you can restrict or allow users to open a form only from certain devices — such as Mobile, Tablet, or Desktop.
This helps improve user experience and ensures form layouts appear as intended on specific devices.
Available Device Options
| Option | Description |
|---|---|
| Mobile | Enables access and optimized layout for smartphone screens. Ideal for quick data entry or field usage. |
| Tab | Enables compatibility for tablets and medium-sized screens. Useful for kiosk-based or inspection forms. |
| Desktop | Provides the full form experience on larger screens — ideal for administrators or advanced form builders. |
You can select one or multiple options based on where your form should be available.
How It Works
- Navigate to your form and open the Configure tab.
- Click the Device View card.
- Choose one or more device types (Mobile, Tab, or Desktop).
- Click Save — your form will only be accessible from the selected device types.
If a user tries to open the form on an unsupported device, a message will appear indicating that the form is not available on that device.
Use Cases
| Scenario | Recommended Device Setting |
|---|---|
| Quick field data collection | Mobile |
| On-site inspection or report entry | Mobile, Tab |
| Detailed registration or review forms | Desktop |
| Admin dashboard or internal audit forms | Desktop only |
Configure - Shared Submission
The Shared Submission feature allows you to link this form's submissions to another form in your project. When enabled, submissions made on this form are shared with — and recorded under — a target form you select.
This is useful when multiple forms feed data into a single master form, or when you want submissions from one form to appear in another form's submission list.
Opening the Shared Submission Panel
- Navigate to your form and open the Configure tab.
- Click the Shared Submission card.
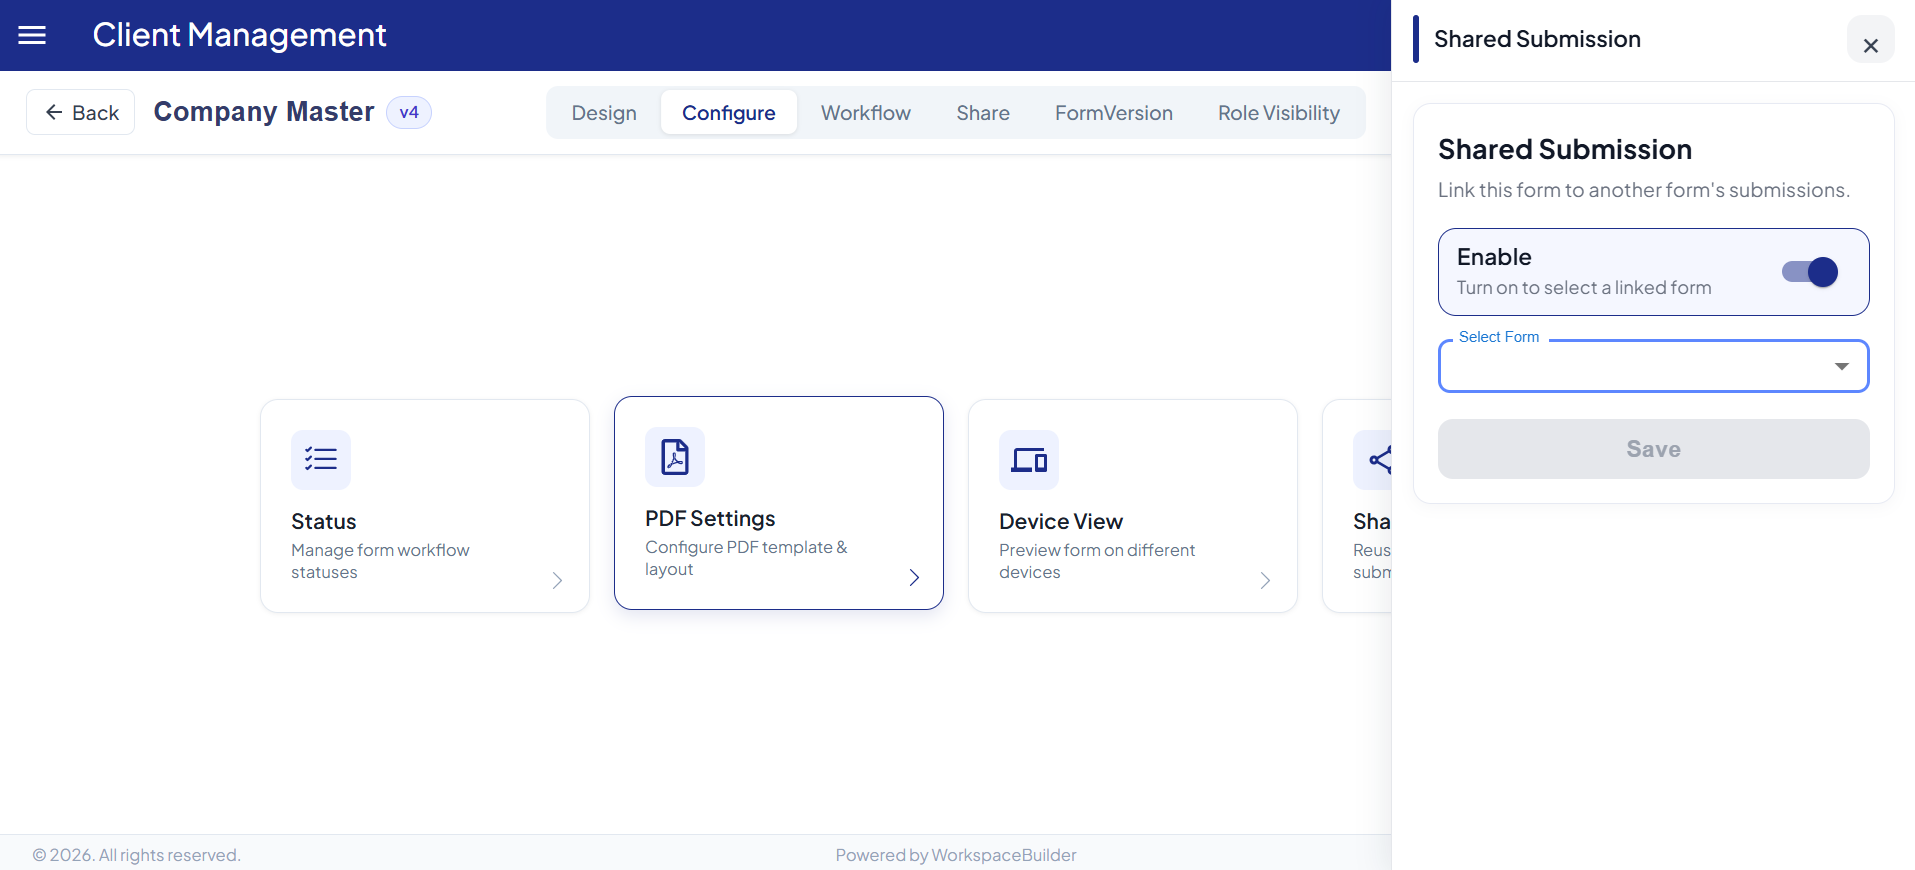
- The Shared Submission sidebar opens on the right.
Enabling Shared Submission
Inside the sidebar, you will see an Enable toggle:
- Toggle ON — Activates shared submission for this form. A Select Form dropdown appears immediately, listing all other forms available in your project.
- Toggle OFF — Disables shared submission. Any previously saved linked form is automatically cleared, and a confirmation toast appears.
The Enable toggle box highlights with a blue border and light blue background when active, giving a clear visual cue that shared submission is turned on.
Selecting the Linked Form
Once the toggle is enabled:
- Click the Select Form dropdown.
- A list of all available forms in the project loads.
- Select the target form you want this form's submissions to be shared with.
- Click Save to persist the configuration.
| State | Behavior |
|---|---|
| Form list loading | A spinner appears inside the dropdown while forms are being fetched. |
| No forms available | The dropdown shows "No forms available." |
| Form selected | The Save button becomes active. |
| Save successful | A success toast confirms the linked form is saved. |
| Save failed | An error toast appears — no changes are applied. |
Disabling Shared Submission
To unlink a form:
- Open the Shared Submission sidebar.
- Toggle the Enable switch OFF.
- The linked form is automatically cleared and a success toast confirms the change.
No manual Save step is needed when toggling off — the system clears the configuration immediately.
Use Cases
| Scenario | How Shared Submission Helps |
|---|---|
| Department-specific intake forms → Central HR form | Employee forms from each department feed submissions into one master HR record form. |
| Multi-step onboarding | Each step is a separate form, but all submissions are linked to the main onboarding form. |
| Inspection sub-forms | Individual inspection section forms submit data shared with a consolidated inspection report form. |
Quick Reference
| Section | What It Does |
|---|---|
| Status | Create and manage submission lifecycle labels (e.g., Pending, Approved). |
| PDF Settings | Configure PDF templates and export layouts for form submissions. |
| Device View | Restrict form access to specific devices (Mobile, Tab, Desktop). |
| Shared Submission | Link this form's submissions to another form in the project. |